Sally Hansen Salon Effects Real Nail Polish Strips – 240 Check It Out Review

Hi guys! Long time no post! It’s been a month! The reason why I haven’t been posting is because I’ve been really busy lately. Plus, one of my nails also broke, and I can’t be bothered to fix it so I was away from swatching for a while — but now I’m back!
Today I will be reviewing Sally Hansen’s Salon Effects Real Nail Polish strips in Check It Out number 240. This is one of the goodies I bought from my trip to America (Btw I hope to go there again soon, I loved everything there!).
At first I didn’t really want to post this review because the photo quality isn’t that decent. I took these photos at around 7pm with room light. But there aren’t many reviews for this product and I miss posting here, so I hope you don’t mind. I’m also trying to improve how I add credits on my photos… so please bear with me.
The kit includes the following:
- 16 Nail Polish Strips
- Cuticle Stick
- Mini File and Buffer
- Detailed instructions of how to apply/use the product
This is my very first time with nail stickers/nail polish strips. I followed the instructions inside the package and this is what it turned out like:
Please note that these photos were taken after three days of wear. As you can see, there aren’t any major chips except around the cuticle and the nail’s free edge.
Application was relatively easy. As instructed in the instruction sheet, the first step into applying the strips is pushing your cuticles using the cuticle stick given in the kit. After that, we have to buff and smooth out the surface of your nail using the buffer (also included in the kit. I did not do this step btw). Then, to apply, select the best-fitting strip for each nail, then you have to peel the strip to remove its clear protective plastic cover and it’s backing paper. Place it above your nail plate and press it down using your fingers. After that remove excess nail strips by gently filing the free edge of the nail.
What I found a bit challenging in the process of applying this that the strips can stretch. The strips are also very sticky, therefore if you make mistakes and decide to pull it from the nail plate and re-apply, the strips can over-stretch. There are 16 strips given in the kit and I think they’ve done a really good job in making sure it will fit with all nail sizes. The instructions did not mention about topcoat, but I did apply a layer of Sally Hansen’s Advanced Hard as Nails Strengthening Top Coat over the strips. I later read on a forum post that we’re supposed to wait an hour before applying any topcoat, I don’t know for sure whether this is true, but what I did turned out just fine!


Overall I really liked how this mani turned out! The pattern is super eye-catching and I received lots of compliments from my friends. If I had a chance I would definitely repurchase these nail strips, and would like to try other patterns as well.

* * * * * * * *
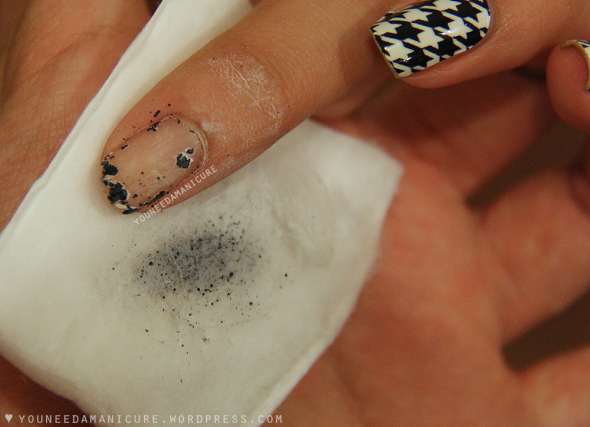
Some of you may want to know about the removal process. It is instructed in the kit to use nail polish remover to remove the strips. When I removed it, I was quite surprised that it removed in tiny bits:

Thank you so much for reading!


